Introduction
Welcome to OpenRMA Documentation Guide.

OpenRMA is a simple, yet powerful software for all kind of technicians and repair shops that needs to keep track their RMA services , jobs, repair works.
OpenRMA works with with a MySQL Database system Cloud based or local based to hold all the information about your customers, repairs, inventory and more.
Just enter your customer details, the product fault description and you are ready to print forms, print parcel labels, thermal tickets, email customer and all the actions your repair shop needs.
As simple as it is.
Requirements
OpenRMA System Requirements.
In order for OpenRMA to run Smoothly we recommend the following minimum system requirements:
*On computers with Microsoft Windows 7, 8, 8.1 and 10 Operating System we recommend to run the program with Administrator privileges (Right click Run as Administrator).
| Software | |
|---|---|
| Supported Operating Systems |
|
| Required Software |
|
| Hardware | |
|---|---|
| CPU | 32-bit and 64-bit Intel® or AMD® multi-core processor |
| Graphics Card Hardware | Any graphics cards with at least 1280x1024 or higher resolution |
| RAM | 2 GB of RAM (4 GB recommended) |
| Disk Space | 500 MB of free disk space for install |
| Screen Resolution | 1680 x 1050 and Higher |
OpenRMA installation video
Here is a 2 minutes installation guide.
Next proceed with the Configuration guide.
Database Connection Setup
How to configure OpenRMA Software to work on your own local or local network database.
By default, OpenRMA Repair Centre software works with a cloud demo database shared with other users trying our demo version. After you purchase and activate the software, you may want to work with your own private database, to store your customers, services and other data. To do so, Press Setup from Main Menu and select Database Connection Wizard as shown in the picture bellow.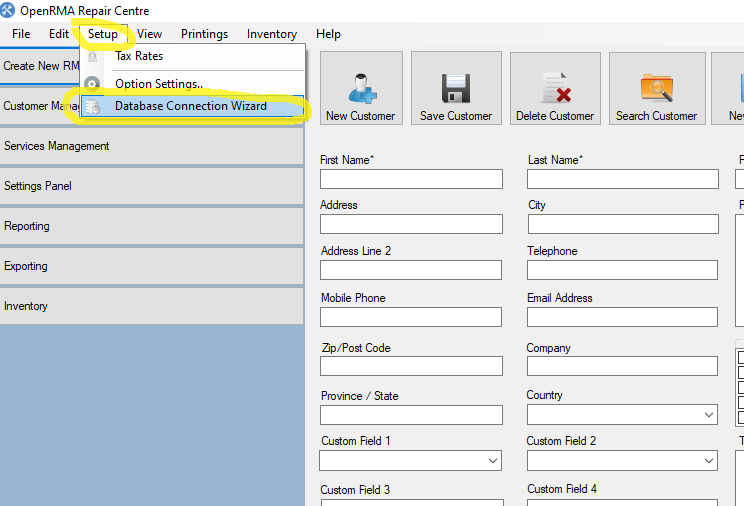 Next you are presented with an easy to use connection Wizard that will guide you in 2 simple steps to connect with your local or cloud database server. Press Next to continue.
 You have 3 options here.
- Connect OpenRMA Software with our Demo database so you can continue test drive the software.
- Connect OpenRMA Software with your own local or local network database.
- Connect OpenRMA Software with our Cloud database option that you purchased from our website.
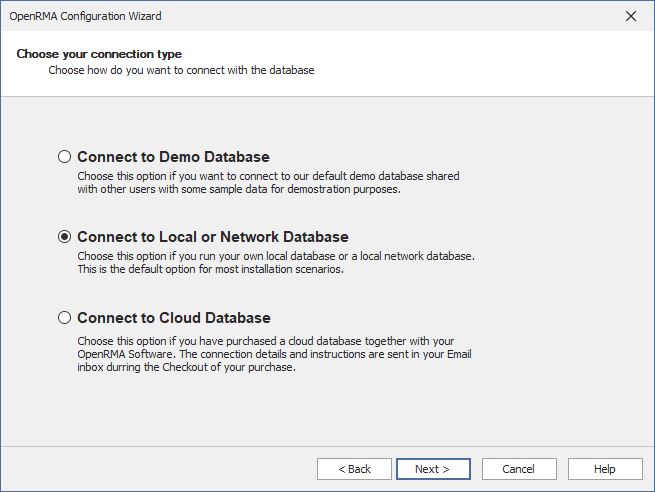 The most Common scenario is to connect OpenRMA Software with your local computer database or to a local network computer that act as a 'server' or 'Main Computer' that will run the database server. If this is your case scenario check the middle radio button "Connect to Local or Network Database" and click next.
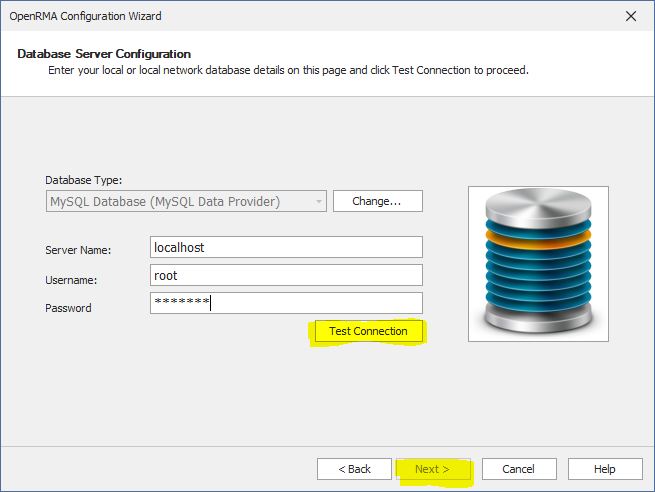 Now the wizard asks for your database server details. if the database is on your local computer then these default settings will do the work for you.
Click Test Connection button as shown in the picture. If the connection details are correct, then the Next button will be enabled and will be able to finish the connection wizard.
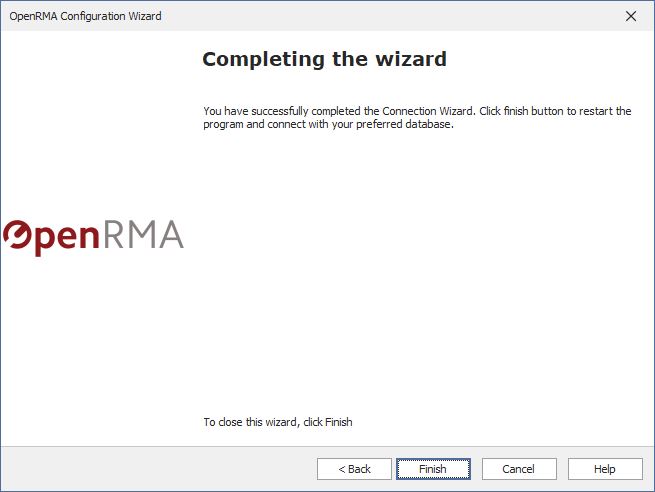
You have completed successfully the connection wizard here and when you press finish the software will restart and you will be ready to use it with your private database configured.
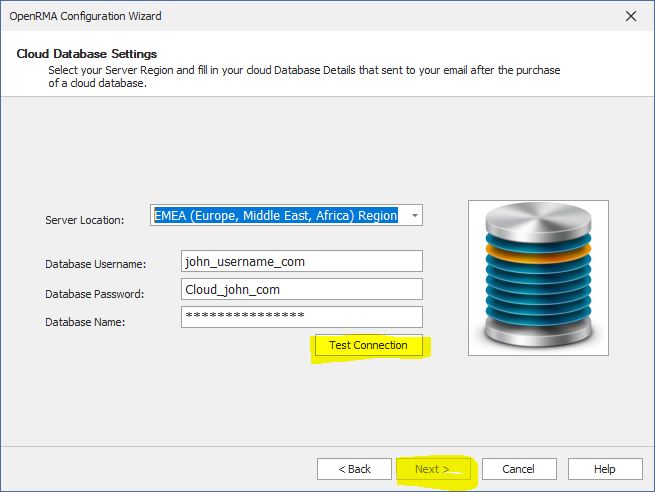
CLOUD DATABASE OPTION
In case you have selected option 3 in the previous step of the wizard (Cloud database option) and you have purchased a cloud database from our website
you will have your database connection details in your email that sent immediately after your checkout.
In this step you need to select the location of the database you purchased. Choose EMEA is you purchased a database for the Europe Region, or US if you purchased a database for USA or CANADA Region.
Fill in your database Username, Database Password and Database Name The details are in the email you received after the purchase of the cloud database.
Finally click Test connection to verify the details you entered. If the details are correct, then the next button will be enabled and it will be allow you to finish the Wizard.
Now the wizard asks for your database server details. if the database is on your local computer then these default settings will do the work for you.
Click Test Connection button as shown in the picture. If the connection details are correct, then the Next button will be enabled and will be able to finish the connection wizard.
You have completed successfully the connection wizard here and when you press finish the software will restart and you will be ready to use it with your private database configured.
CLOUD DATABASE OPTION
In case you have selected option 3 in the previous step of the wizard (Cloud database option) and you have purchased a cloud database from our website
you will have your database connection details in your email that sent immediately after your checkout.
In this step you need to select the location of the database you purchased. Choose EMEA is you purchased a database for the Europe Region, or US if you purchased a database for USA or CANADA Region.
Fill in your database Username, Database Password and Database Name The details are in the email you received after the purchase of the cloud database.
Finally click Test connection to verify the details you entered. If the details are correct, then the next button will be enabled and it will be allow you to finish the Wizard.
Activating Software License
Activating OpenRMA Software
See the video tutorial bellow or read the manual instructions.
After a valid purchase of OpenRMA Repair Centre Standard or Professional edition, you will receive an email with your license file that activates your software permanently.
Save the license file anywhere (for example on Desktop) and then OpenRMA Software and go to Menu Help ---> Apply License/Activate Software.
 A new window will open so you can select your license file you saved before. To select your file we sent you via email click on the Apply License Button and select the license file. After validation of license file the program will Open Automatically activated without any other restrictions.
 If you have Purchased Professional edition and have a number of Volume Licenses pre-activated for specific computers, just enter your Name, Company, Email (The email you used to purchase the software licenses) and hit Request Activation button. If the user details are correct, the software will be activated automatically for you.
If you still have trouble, activating your software you can open a Support Ticket by clicking here.
If you have Purchased Professional edition and have a number of Volume Licenses pre-activated for specific computers, just enter your Name, Company, Email (The email you used to purchase the software licenses) and hit Request Activation button. If the user details are correct, the software will be activated automatically for you.
If you still have trouble, activating your software you can open a Support Ticket by clicking here.
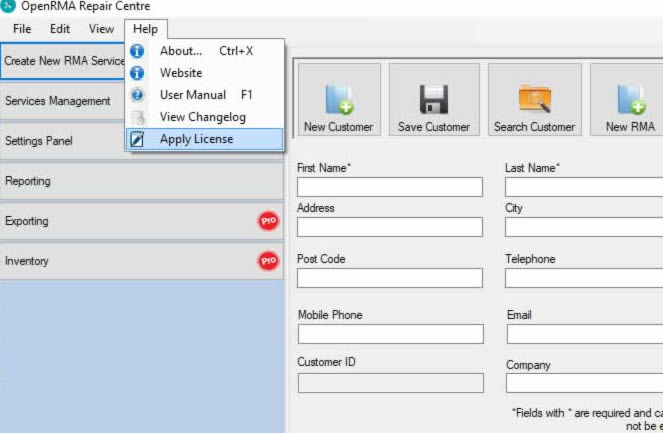 A new window will open so you can select your license file you saved before. To select your file we sent you via email click on the Apply License Button and select the license file. After validation of license file the program will Open Automatically activated without any other restrictions.
 If you have Purchased Professional edition and have a number of Volume Licenses pre-activated for specific computers, just enter your Name, Company, Email (The email you used to purchase the software licenses) and hit Request Activation button. If the user details are correct, the software will be activated automatically for you.
If you still have trouble, activating your software you can open a Support Ticket by clicking here.
If you have Purchased Professional edition and have a number of Volume Licenses pre-activated for specific computers, just enter your Name, Company, Email (The email you used to purchase the software licenses) and hit Request Activation button. If the user details are correct, the software will be activated automatically for you.
If you still have trouble, activating your software you can open a Support Ticket by clicking here. Devices and trouble lists
Adding common problems to quick troubles list and Common devices to quick devices list
Common problems to quick trouble list.
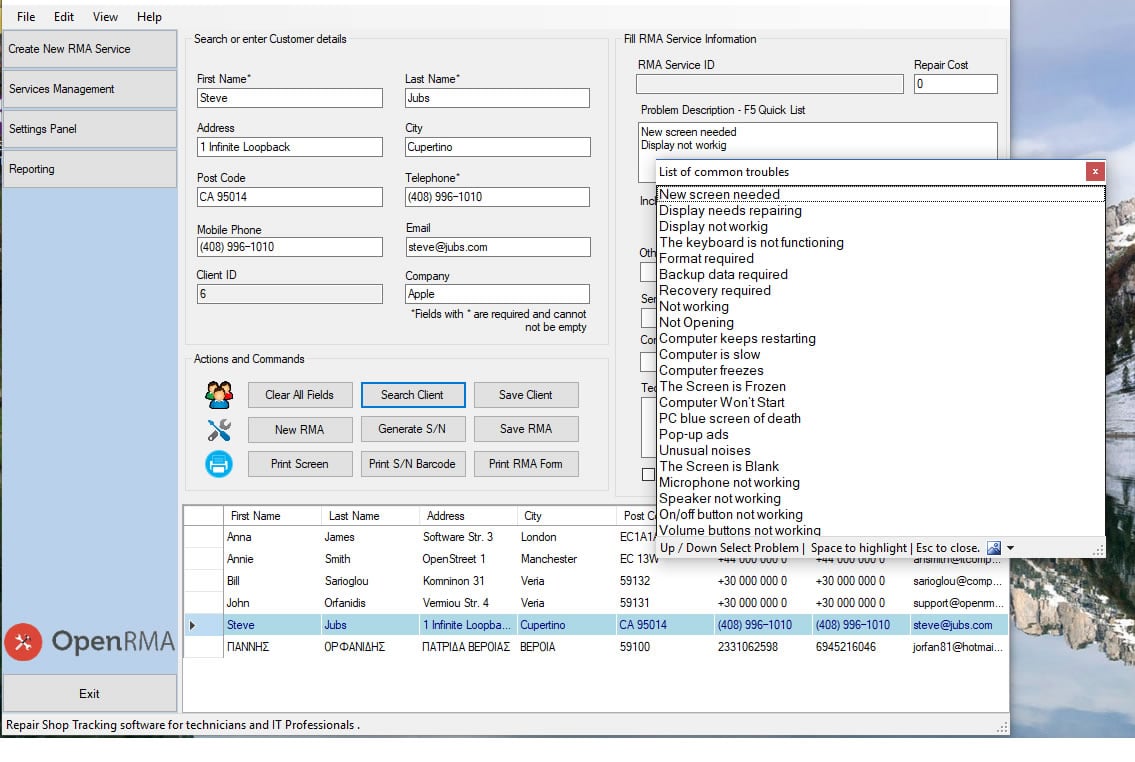
When you first check-in a customer, you can quick select from a common list of usual troubles or fault descriptions so you don't have to type it all the time (for example display not working or Display Replacement, format Computer and so on).
 Common devices to quick devices list.
Also when you type what type of device comes for repairing (for example iPhone7, Samsung Galaxy s8 edge etc.) you can also select a device from common devices list. The list is show as you type if Product name field.
Common devices to quick devices list.
Also when you type what type of device comes for repairing (for example iPhone7, Samsung Galaxy s8 edge etc.) you can also select a device from common devices list. The list is show as you type if Product name field.
 To change the devices and descriptions on both lists you have to edit the 2 text files (Devices.txt and Problems.txt) located in OpenRMA Installation directory (by default is C:\Program Files (x86)\OpenRMA Standard) or From menu Edit select Devices Quicklist or Troubles Quicklist. The file will open with Notepad program so you can edit the listings you want.
If you accidentally deleted the file, the program will ask you to create it. Just select yes.
Add one device or trouble per line. Save them and restart OpenRMA program.
Your new devices and trouble will automatically populated on lists.
To change the devices and descriptions on both lists you have to edit the 2 text files (Devices.txt and Problems.txt) located in OpenRMA Installation directory (by default is C:\Program Files (x86)\OpenRMA Standard) or From menu Edit select Devices Quicklist or Troubles Quicklist. The file will open with Notepad program so you can edit the listings you want.
If you accidentally deleted the file, the program will ask you to create it. Just select yes.
Add one device or trouble per line. Save them and restart OpenRMA program.
Your new devices and trouble will automatically populated on lists.
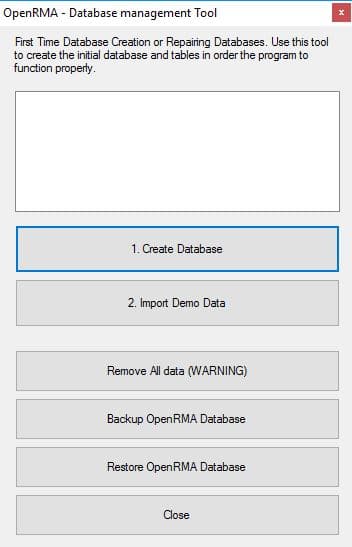
Backup / Restore Database
Backup OpenRMA Data
In order to backup the database, you have to go to settings, then database management tool.
You will see the above menu. From this menu you can press the "Backup OpenRMA database" button and a backup dump (.sql file) will be created on OpenRMA folder inside the users Document directory. For example "c:\users\<username>\Documents\OpenRMA" folder.
This is a complete backup with all data used by OpenRMA (Customers, Services, Attachments, Settings and so on).
You can use this backup file (.sql file) to restore to a second OpenRMA instance machine.
Restore OpenRMA backup file
To restore a backup file, press the "Restore OpenRMA Database" button.
A new Dialog window opens and ask you to select a backup file to restore. After selecting your file a warning window appears and warning you about restoration. WARNING: This action will DELETE all data of the program (customers, services, attachments and so on) and it will restore the data from the backup file. So it is wise to backup your database first.

Add Custom RMA Forms
Changing default RMA Print form.
New version of OpenRMA now loads default print form from the form folder inside the Application Installed Directory. Default location is ""C:\Program Files (x86)\OpenRMA Standard\". Inside the forms directory you will see the "default_en-US.jpg" image file. This is the default RMA print form in English format.
You can use any image editing tool to customize the appearance of the image. Edit you own Banner and/or change your terms and conditions printed.
Note: Do not change the place of the fields (name, address telephone etc.) because these are by default printed on this location.
If you wish you can sent us an email to support@openrma.com and sent us your default header logo and terms and conditions and we will generate your custom RMA form.
Creating New RMA Service
Video Tutorial to create a new RMA Repair Service.
Creating New RMA Service
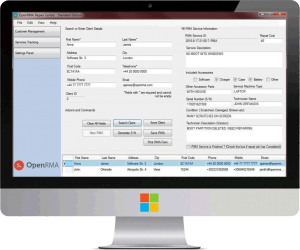
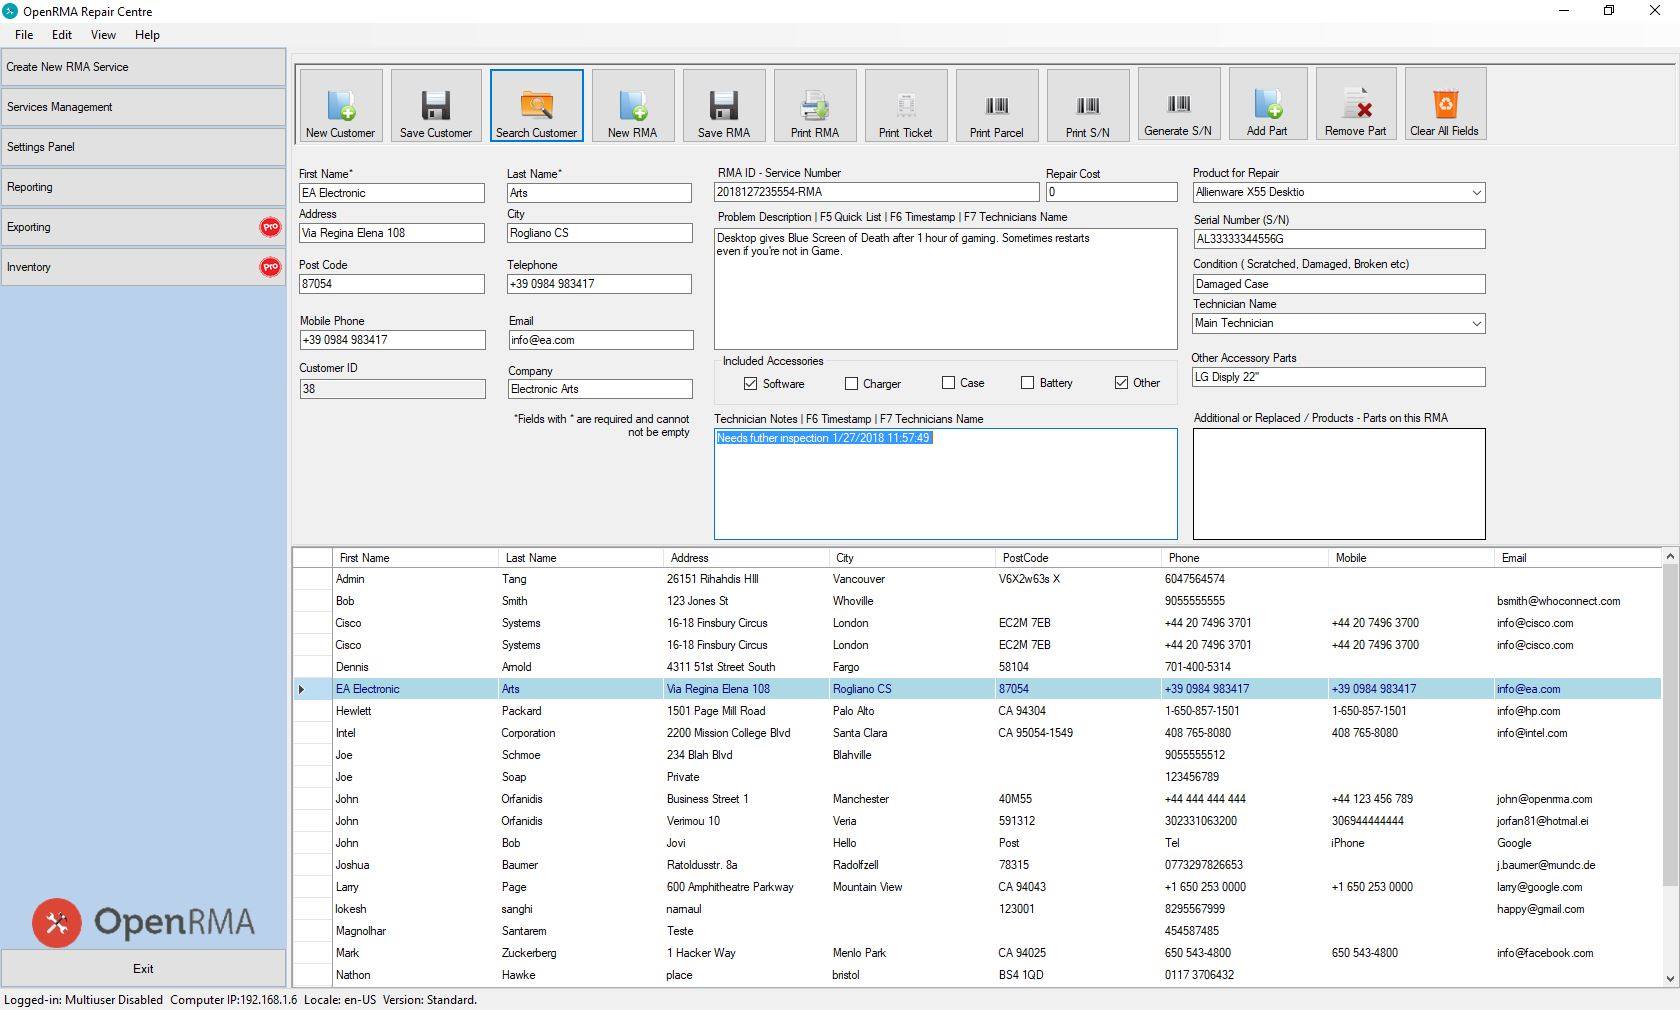
To create a new RMA Service, first you must fill the customer details on the Main Screen.
First Name and Last Name are the minimum required fields that you have to enter in order to save the new client.
When you are done with all the customer details, press the Save customer Button.
Next step is to fill the RMA Service Information (Product type, Condition, Accessories, Problem Description and so on.)
When you are done with the Service Details Press the Save RMA button.
 Now the new RMA Service have created and saved into the database.
That was the process of creating a new RMA service.
Now for adding additional Technician notes later when a technician starts to repair this service, you may press the Services Tracking button on the left. The RMA Services Management form open and you can search for a particular service based on RMA ID, telephone, Serial number and/or customer name.
When you find you service double click it from the list on the bottom and all the fields will populate with the service details, so you can modified as needed.
When you are done with this Repairing you can check the RMA Finished checkbox so you can filter your results later.
Now the new RMA Service have created and saved into the database.
That was the process of creating a new RMA service.
Now for adding additional Technician notes later when a technician starts to repair this service, you may press the Services Tracking button on the left. The RMA Services Management form open and you can search for a particular service based on RMA ID, telephone, Serial number and/or customer name.
When you find you service double click it from the list on the bottom and all the fields will populate with the service details, so you can modified as needed.
When you are done with this Repairing you can check the RMA Finished checkbox so you can filter your results later.
 Now the new RMA Service have created and saved into the database.
That was the process of creating a new RMA service.
Now for adding additional Technician notes later when a technician starts to repair this service, you may press the Services Tracking button on the left. The RMA Services Management form open and you can search for a particular service based on RMA ID, telephone, Serial number and/or customer name.
When you find you service double click it from the list on the bottom and all the fields will populate with the service details, so you can modified as needed.
When you are done with this Repairing you can check the RMA Finished checkbox so you can filter your results later.
Now the new RMA Service have created and saved into the database.
That was the process of creating a new RMA service.
Now for adding additional Technician notes later when a technician starts to repair this service, you may press the Services Tracking button on the left. The RMA Services Management form open and you can search for a particular service based on RMA ID, telephone, Serial number and/or customer name.
When you find you service double click it from the list on the bottom and all the fields will populate with the service details, so you can modified as needed.
When you are done with this Repairing you can check the RMA Finished checkbox so you can filter your results later. Manage existing RMA Services
Video Tutorial to manage existin RMA Repair Services.
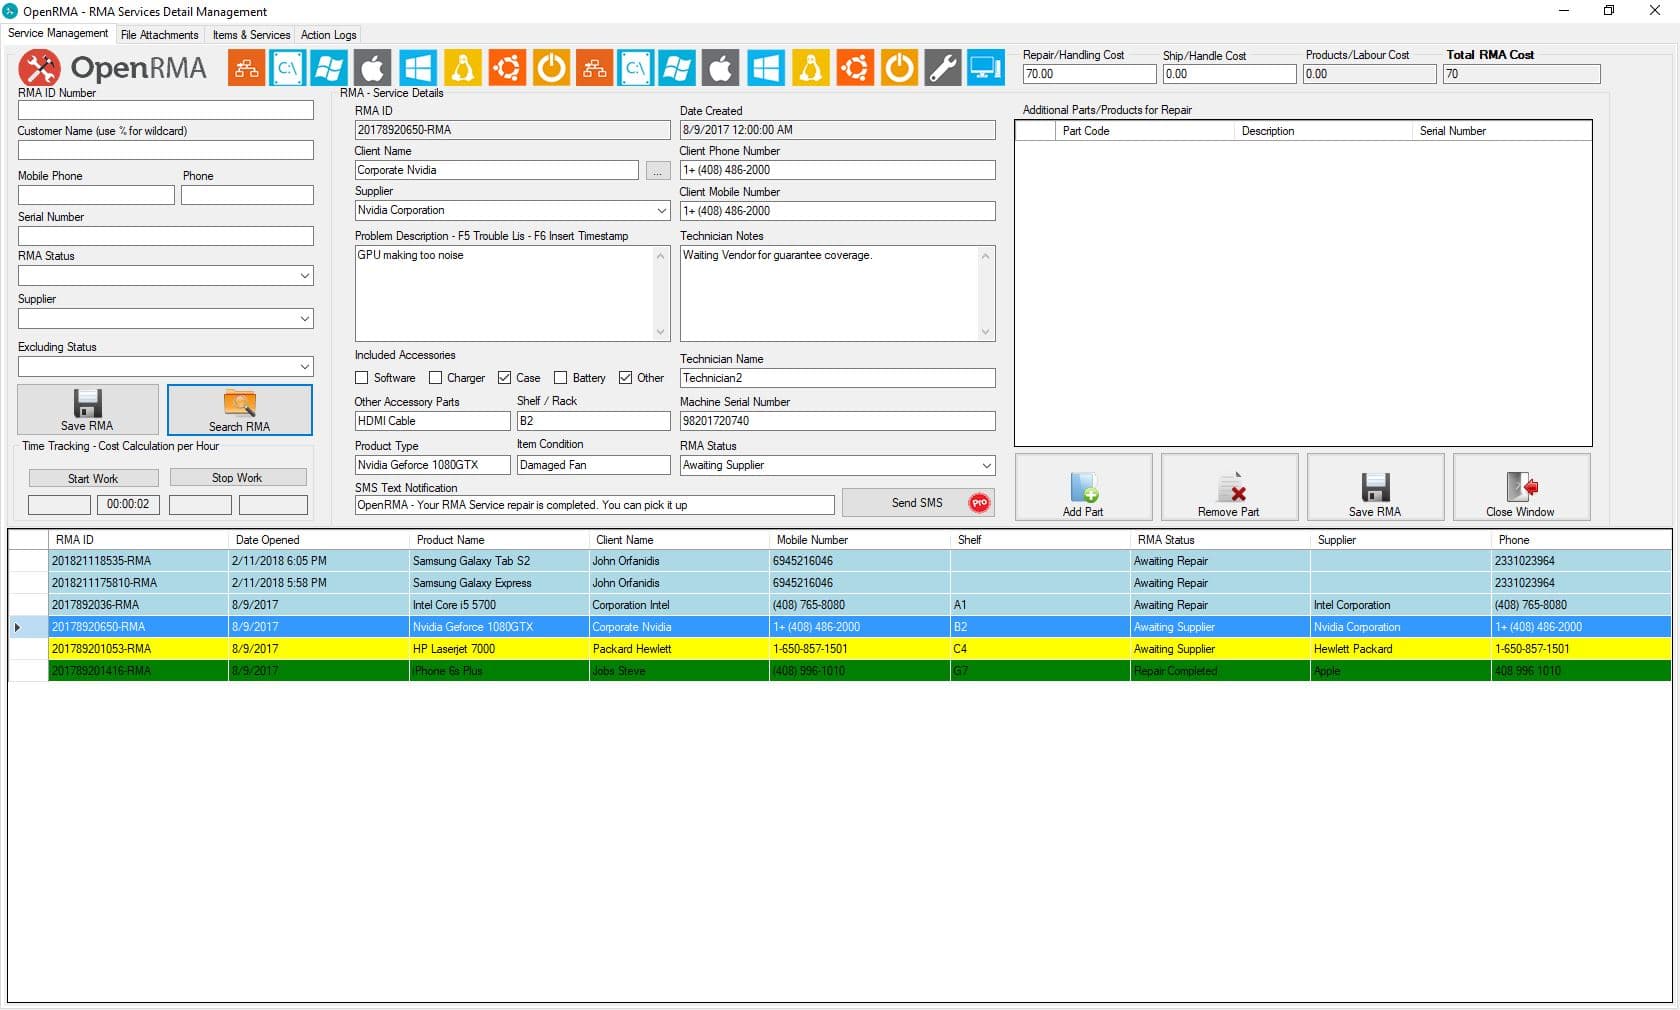
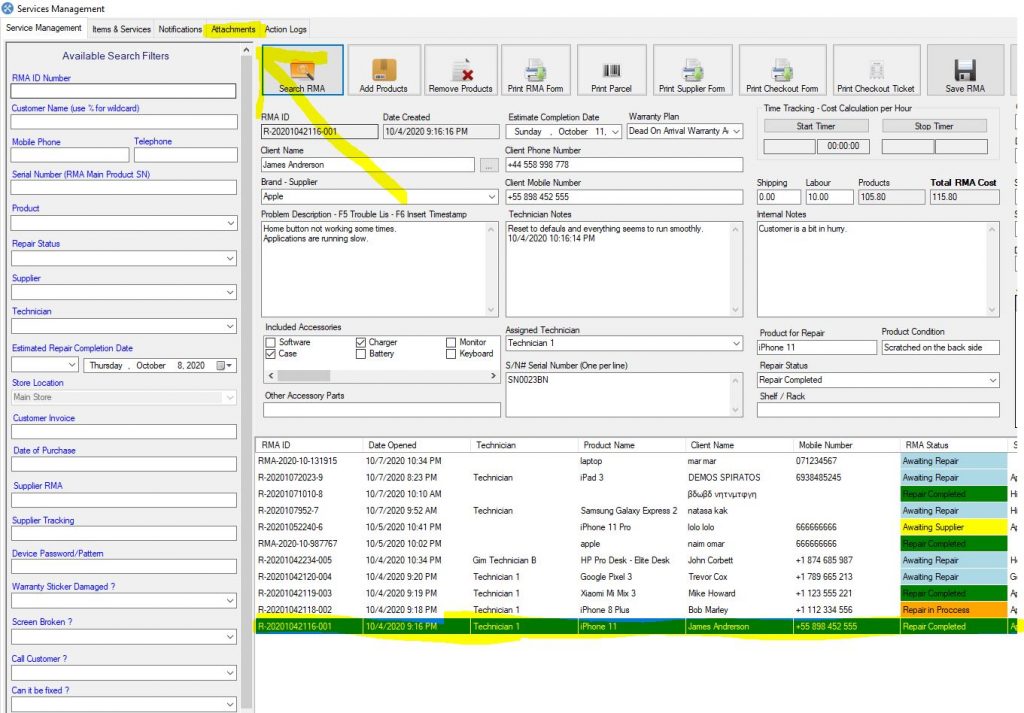
After you have opened a RMA service for a customer you or your technician may start repairing and fill the required details, information for their reference. For example the Technician inspection result, working hours and other useful information required by your Tech store. To do this you need to open the Services Tracking from the left of the main screen.
You can press the search button to search all the RMA from the database or you can filter the service you want to search and work on.
For example you may want to scan with the barcode scanner the rma id on the printed form of a particular RMA and then you are ready to work and fill all the details you need. You can also search a service by serial number, customer phone, name.
Finally after you have finished you work you can save the RMA by clicking on Save button.
 You can press the search button to search all the RMA from the database or you can filter the service you want to search and work on.
For example you may want to scan with the barcode scanner the rma id on the printed form of a particular RMA and then you are ready to work and fill all the details you need. You can also search a service by serial number, customer phone, name.
Finally after you have finished you work you can save the RMA by clicking on Save button.
You can press the search button to search all the RMA from the database or you can filter the service you want to search and work on.
For example you may want to scan with the barcode scanner the rma id on the printed form of a particular RMA and then you are ready to work and fill all the details you need. You can also search a service by serial number, customer phone, name.
Finally after you have finished you work you can save the RMA by clicking on Save button.
Add attachments to RMA Service
In order to attach files within a specific RMA Repair Service, for example images of the Warranty card, an invoice purchase or just photos with the condition of the product, you need to go to Services Management from the third button on the left. Then you need to select your Repair Service from the list and once the details of the RMA Repair are populated on the screen, you need to press the Attachments TAB on the upper side of the Window. See screenshots bellow:


QuickBooks Desktop Integration Guide
QuickBooks integration guide for OpenRMA Repair Centre Software.